
In Part 1 of this series we created the required Roles, Profiles and Class as collections within SCCM. In this next post, we’ll create a web service which queries SCCM and then creates ENC compatible responses, which can then be consumed by Puppet.
All scripts and examples are at the blog code repository
ENC Requirements
What is an ENC?
An external node classifier is an arbitrary script or application which can tell Puppet which classes a node should have.
The script or application is executed in the master during operations such as catalog compilation. Some ENCs can be complex scripts written in ruby or python, or can be as simple as using curl to query a web service; which is what we’ll be using in this post.
Note that the ENC script itself will be very simple and have no ability to recover from errors or retry if there’s a network failure etc.
When the ENC script is executed, the only parameter is the node name, typically the fully qualified domain name (FQDN) of a node.
ENC data format
ENC expects a YAML document to be returned by the script, or nothing.
Here’s an example of a fully populated ENC response from the Puppet documentation;
---
classes:
    common:
    puppet:
    ntp:
        ntpserver: 0.pool.ntp.org
    aptsetup:
        additional_apt_repos:
            - deb localrepo.example.com/ubuntu lucid production
            - deb localrepo.example.com/ubuntu lucid vendor
parameters:
    ntp_servers:
        - 0.pool.ntp.org
        - ntp.example.com
    mail_server: mail.example.com
    iburst: true
environment: production
So using our example Roles and Profiles from Part 1 an example YAML response for a Windows node in the AdvWorks-WebServer role would look like;
classes:
    shared::iis::no_default_website:
    advworks::website:
    shared::iis:
    shared::iis::security:
Querying SCCM
So how do we get the information needed to populate the YAML file? SCCM uses a rather large MS SQL Server to house all of the required information, so for the most part it’s just a case of navigating the database schema.
So for our SQL query we need to find all of the collections a system (Puppet Node) is a member of, given a system’s FQDN. Once we have the collection list, we can use the collection names to populate the YAML response.
The SQL Query
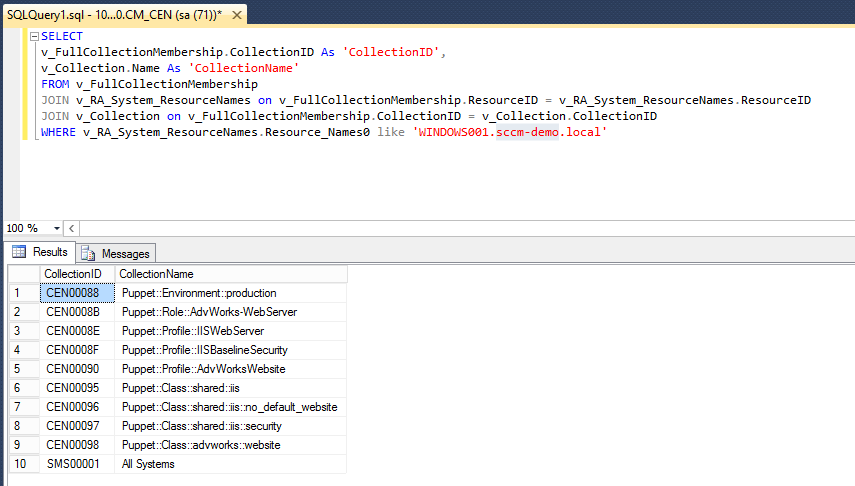
So after some trial and error here’s the query that gets the required information
SELECT
v_FullCollectionMembership.CollectionID As 'CollectionID',
v_Collection.Name As 'CollectionName'
FROM v_FullCollectionMembership
JOIN v_Collection on v_FullCollectionMembership.CollectionID = v_Collection.CollectionID
JOIN v_RA_System_ResourceNames on v_FullCollectionMembership.ResourceID = v_RA_System_ResourceNames.ResourceID
WHERE v_RA_System_ResourceNames.Resource_Names0 like '<fqdn of system>'
In our example, I’ve assigned a system called WINDOWS001.sccm-demo.local to the AdvWorks-WebServer role collection. Using SQL Management Studio (or your SQL tool of choice), we can run this query against the SCCM Database;
If you’re not familiar with querying SCCM, it can look quite foreign so let’s break down the query so it’s easier to understand;
The names that are prefixed with v_ e.g. v_FullCollectionMembership are actually Views, not Tables. The SCCM database schema makes heavy use of views and should be used in preference to querying the SCCM tables. Mainly because it’s generally faster and easier to understand that the raw tables. Seriously, have a look at the tables in SCCM! Crazy!
To get the information needed we use three views;
v_RA_System_ResourceNames
This view has the discovery data for each system in the SCCM Datbase, in particular it has the FQDN of the system and its ResourceID. All resources, User and System, are referenced by it’s ResourceID in foregin tables.
v_FullCollectionMembership
As the name implies, this view is a simple list of CollectionID,ResourceID pairs. The CollectionID is uniqueID of a collection and is used in foreign tables such as this.
v_Collection
This view holds basic information about every collection. In particular for us, the Name and CollectionID of collections.
So the workflow of the query is;
Given a FQDN of a system, we query
v_RA_System_ResourceNamesfor the ResourceID
...
JOIN v_RA_System_ResourceNames ...
WHERE v_RA_System_ResourceNames.Resource_Names0 like '<fqdn of system>'
Once we have the ResourceID we join
v_FullCollectionMembershipfor all of the collections the resource is a member of
...
JOIN v_RA_System_ResourceNames on v_FullCollectionMembership.ResourceID = v_RA_System_ResourceNames.ResourceID
...
Once we have the CollectionIDs we join
v_Collectionfor all of the details of the collections the resource is a member of
...
FROM v_FullCollectionMembership
JOIN v_Collection on v_FullCollectionMembership.CollectionID = v_Collection.CollectionID
...
Once we have all of the details of the collection we return the collection name and unique ID
SELECT
v_FullCollectionMembership.CollectionID As 'CollectionID',
v_Collection.Name As 'CollectionName'
...
Making a Web Service in Powershell
As this is a proof of concept, we can quickly create a Web Service using Powershell. This isn’t as crazy as it sounds as Powershell has the full power of the .Net Framework at its disposal, including the System.Net.HttpListener namespace. A great example can be found here and was used as a basis for our script.
ENC Web Service details
So our webservice is going to receive the system name as part of the URL e.g. http://localhost:8080/WINDOWS001.sccm-demo.local. This will make it easy to query from the Puppet master and easy to diagnose.
Note that I’m using HTTP as the transport, not HTTPS. This was just to make it easier to write this script and show how you quickly you can create a proof-of-concept web service in Powershell. If you are thinking of using this yourself I would recommend using a more rebust web server and language e.g. ASP.NET on IIS, and use a more secure transport, such as HTTPS with both client and server certificate validation. The information that is transferred by an ENC could be very handy for nefarious purposes!
SCCM-ENC-WebService.ps1
The script takes six parameters;
-
HTTPEndpoint - The listener for the web service. By default it listens on all IP Addresses at port 8080
-
ConfigMgrSite - The site code of the SCCM Site you are querying. This is required and is the three letter site code e.g. CEN
-
DatabaseServer - These are the details to connect to the SQL Database
-
DatabaseUsername, DatabasePassword - These the credentials to connect to the database. This script assumes SQL based authentication is enabled, however it can be easily modified to use Windows based authentication
[cmdletBinding(SupportsShouldProcess=$false,ConfirmImpact='Low')]
param(
  [Parameter(Mandatory=$false,ValueFromPipeline=$false)]
  $HTTPEndPoint = 'http://*:8080/'

  # SCCM Info
  ,[Parameter(Mandatory=$true,ValueFromPipeline=$false)]
  $ConfigMgrSite

  # SCCM Database Settings
  ,[Parameter(Mandatory=$true,ValueFromPipeline=$false)]
  $DatabaseServer

  ,[Parameter(Mandatory=$true,ValueFromPipeline=$false)]
  $DatabaseUsername

  ,[Parameter(Mandatory=$true,ValueFromPipeline=$false)]
  $DatabasePassword
)

$ErrorActionPreference = 'Stop'
$VerbosePreference = 'Continue'
Next we setup some configuration information. The SCCM Collection prefix names which we used in our Part 1 example. We also setup a regular expression to validate computers names that are requested. It’s a cheap way of doing simple input validation
$DatabaseName = "CM_$($ConfigMgrSite)"
# SCCM Collection Settings
$EnvironmentCollectionPrefix = 'Puppet::Environment::'
$RoleCollectionPrefix = 'Puppet::Role::'
$ProfileCollectionPrefix = 'Puppet::Profile::'
$ClassCollectionPrefix = 'Puppet::Class::'
# Configuration
$HostnameRegex = '^(([a-zA-Z0-9]|[a-zA-Z0-9][a-zA-Z0-9\-]*[a-zA-Z0-9])\.)*([A-Za-z0-9]|[A-Za-z0-9][A-Za-z0-9\-]*[A-Za-z0-9])$'
The following three functions are just helper functions when querying SQL databases in Powershell;
-
Get-MSSQLConnection - Is used to create a
System.Data.SqlClient.SQLConnectionobject which is then used when executing queries -
Get-MSSQLQuery - Is used to execute SQL queries and returns an array of
System.Data.DataTableobjects which is the result of the query -
Confirm-DBConnectivity - Is used to validate a database connection by executing a simple query; Return the first System in the SCCM Database
function Get-MSSQLQuery {
...
}
function Get-MSSQLConnection {
...
}
function Confirm-DBConnectivity {
...
}
Get-NodeResponse is the main function in this script and takes an input of the computer query and will output a YAML document as a string. Firstly it creates a database connection and creates the SQL query we’ll against the database.
function Get-NodeResponse($NodeName) {
  try
  {
    Write-Verbose "Querying $NodeName ..."
    $sqlConn = Get-MSSQLConnection -ServerInstance $DatabaseServer `
        -Database $DatabaseName -Username $DatabaseUsername -Password $DatabasePassword

    # Get the list of all collections for this node...
    $query = "SELECT" + `
             " v_FullCollectionMembership.CollectionID As 'CollectionID'," + `
             " v_Collection.Name As 'CollectionName'" + `
             " FROM v_FullCollectionMembership " + `
             " JOIN v_RA_System_ResourceNames on v_FullCollectionMembership.ResourceID = v_RA_System_ResourceNames.ResourceID" + `
             " JOIN v_Collection on v_FullCollectionMembership.CollectionID = v_Collection.CollectionID " + `
             " WHERE v_RA_System_ResourceNames.Resource_Names0 like '$($NodeName)'"

    $nodeEnv = ''
    $nodeProfiles = @{}
    $nodeRoles = @{}
    $nodeClasses = @{}
Next we execute query and for each row returned, we retrieve the CollectionID and CollectionName
    $dbResult = Get-MSSQLQuery -ConnectionObject $sqlConn -Query $query

    $dbResult.Rows | % {
      $collID = $_.CollectionID.ToString()
      $collName = $_.CollectionName.ToString()
Now we know the collection name we can use simple text comparisons to classify the collection as an Environment, Role, Profile or Class. We then build up a list of all of the types of collections.
The enviornment collections are special. As there can be only one environment, we only care about the last environment name. This could probabyl be tested and throw an error if multiple environments are assigned; much like the Roles.
      # Environment type collection
      if ($collName.StartsWith($EnvironmentCollectionPrefix)) {
        Write-Verbose "Found Environment collection $collName"
        $nodeEnv = $collName.SubString($EnvironmentCollectionPrefix.Length)
      }
      # Role type collection
      if ($collName.StartsWith($RoleCollectionPrefix)) {
        Write-Verbose "Found Role collection $collName"
        $nodeRoles.Add($collID,$collName)
      }
      # Profile type collection
      if ($collName.StartsWith($ProfileCollectionPrefix)) {
        Write-Verbose "Found Profile collection $collName"
        $nodeProfiles.Add($collID,$collName)
      }
      # Module type collection
      if ($collName.StartsWith($ClassCollectionPrefix)) {
        Write-Verbose "Found Class collection $collName"
        $nodeClasses.Add($collID,$collName)
      }
    }
Once we have all of the collections we can perform some sanity checks;
-
Was there an environment specified
-
Was there one and only one Role collection specified
If an error is found, an empty string is returned as per the ENC specification
    if ($nodeEnv -eq '') {
      Write-Verbose "Unable to find any environments"
      return ""
    }

    If ($nodeRoles.Count -gt 1) {
      Write-Verbose "Node is a member of more than one role"
      return ""
    }
Now that we’ve passed the sanity checks we can build up the YAML document. All of the Class collections are enumerated and appended to the classes: section in the document. Finally the environment is appended to the end.
There is an all encompassing try-catch block, which in the event of error just returns an empty string.
    # Get the Classes List
    $ClassNames = $nodeClasses.GetEnumerator() | % {
      Write-Output $_.Value.Substring($ClassCollectionPrefix.Length)
    } | Select-Object -Unique

    # Generate Response
    $response = "---`nclasses:`n"
    $ClassNames | % {
      $response += "    $($_):`n"
    }
    $response += "environment: $nodeEnv`n"

    Write-Output $response
  }
  catch [System.Exception] {
    Write-Verbose "ERROR: $($_)"
    return ""
  }
}
The remainder of the script is the web service. First we check that we can connect to the database and then create a System.Net.HttpListener .Net object which will run our web service. The listening URL is important as the web service will not respond to different URLs e.g. if you specify http://localhost:8080 then you won’t be able to access the webservice using http://computer.domain:8080. The default is to respond to any request on port 8080.
If (-not (Confirm-DBConnectivity)) {
  throw "Error while connecting to the Database"
}

$url = $HTTPEndPoint
$listener = New-Object System.Net.HttpListener
$listener.Prefixes.Add($url)
$listener.Start()

Write-Verbose "Listening at $url..."
The web server is a simple loop which waits for a connection, extracts the computer name from the URL and then returns the response from the Get-NodeResponse function. It also returns simple HTTP error codes for bad requests or server errors.
One problem with this setup is there is no way to break the while-loop because the function to wait for connections is blocking. To get around this, we add a route for http://<host>/kill which will exit the web server.
while ($listener.IsListening)
{
  $context = $listener.GetContext()
  $requestUrl = $context.Request.Url
  $response = $context.Response

  try {
    $localPath = $requestUrl.LocalPath
    if ($localPath -eq '/kill') { $listener.Close(); break; }

    # Example Node request URI for (hostname.domain.com);
    #   http://10.1.1.1/hostname.domain.com
    if ($localPath.LastIndexOf('/') -eq 0) {
      $computerName = $localPath.SubString(1).Trim()
      if ($computerName -match $HostnameRegex) {
        Write-Verbose "Request: NodeName = $computerName"
        $content = (Get-NodeResponse -NodeName $computerName)
        Write-Verbose "Response: $content"
        $buffer = [System.Text.Encoding]::UTF8.GetBytes($content)
        $response.ContentLength64 = $buffer.Length
        $response.OutputStream.Write($buffer, 0, $buffer.Length)
      } else {
        $response.StatusCode = 400
      }
    } else {
      $response.StatusCode = 404
    }
  } catch {
    $response.StatusCode = 500
  }

  $response.Close()
}
Runing the web service
To run the script we run the powershell with the appropriate parameters;
$props = @{
  # SCCM Info
  ConfigMgrSite = 'CEN'
  # SCCM Database Settings
  DatabaseServer = '10.1.1.1'
  DatabaseUsername = 'sa'
  DatabasePassword = '********'
}
. .\Puppet_SCCM_ENC.ps1 @props -Verbose
Output
VERBOSE: Listening at http://*:8080/...
Testing the web service
So lets this webservice…
Using powershell
PS C:\Users\Administrator> (invoke-webrequest -uri 'http://localhost:8080/WINDOWS001.sccm-demo.local').RawContent
HTTP/1.1 200 OK
Content-Length: 141
Date: Mon, 13 Jun 2016 05:27:07 GMT
Server: Microsoft-HTTPAPI/2.0

---
classes:
    shared::iis::no_default_website:
    advworks::website:
    shared::iis:
    shared::iis::security:
environment: production
Which gives the verbose output on the webservice
VERBOSE: Request: NodeName = WINDOWS001.sccm-demo.local
VERBOSE: Querying WINDOWS001.sccm-demo.local ...
VERBOSE: Found Environment collection Puppet::Environment::production
VERBOSE: Found Role collection Puppet::Role::AdvWorks-WebServer
VERBOSE: Found Profile collection Puppet::Profile::IISWebServer
VERBOSE: Found Profile collection Puppet::Profile::IISBaselineSecurity
VERBOSE: Found Profile collection Puppet::Profile::AdvWorksWebsite
VERBOSE: Found Class collection Puppet::Class::shared::iis
VERBOSE: Found Class collection Puppet::Class::shared::iis::no_default_website
VERBOSE: Found Class collection Puppet::Class::shared::iis::security
VERBOSE: Found Class collection Puppet::Class::advworks::website
VERBOSE: Response: ---
classes:
    shared::iis::no_default_website:
    advworks::website:
    shared::iis:
    shared::iis::security:
environment: production
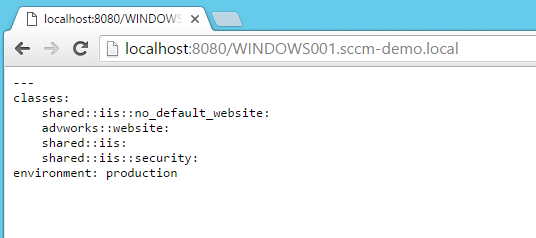
We can also query the web service using a web-browser
and finally using curl
Glenn:~ glenn.sarti$ curl http://10.0.0.1:8080/WINDOWS001.sccm-demo.local
---
classes:
    shared::iis::no_default_website:
    advworks::website:
    shared::iis:
    shared::iis::security:
environment: production
What’s next?
In Part 3, we’ll configure Puppet to use our ENC web service and then try out some node classifications for real.


Comments